Sunday, 11 October 2015

Skin B5 Skin Care Review


Hello Lovelies,

Holy cow, have the last few months been busy ! I have been so caught up with my course and being on placement at a local High school - which I am absolutely loving ! I also turned 21 on the 22nd of September and was extremely spoiled by my friends and family, but enough about whats been happening in my life, I wanted to tell you all about a fabulous new skincare system I have been using, called Skin B5.


When Skin B5 reached out to me and asked if I would be interested in trialing their range, I jumped on their website to see what it was all about and was sold immediately. Skin B5 is a 4 step skin care system, that is packed full of natural ingredients to help repair the skin, whilst treating and preventing acne. Science was never my strong point at school, so I will leave all the in-depth explanation to the website, which I will link below. One of the main ingredients of the formula is Vitamin B5, which is known to have amazing benefits for the skin, such as retaining moisture, as well as healing and regenerating the skin. There are so many incredible benefits from Skin B5's products, including: The tightening of pores, preventing breakouts and evening out the skin tone, just to name a few.

I received the "Clear Skin Starter Pack" which includes the Acne Control Cleansing Mousse, Acne Control Moisturiser, Acne Control Caplets and Acne Control Extra Strength Tablets, as well as the 5-Minute Skin Purifying Mask which can be added for an additional $15. Both the tablets and caplets are packed full of ingredients to help not only your skin, but also balancing hormones and strengthening the immune system. I know not everyone is comfortable with taking tablets or supplements, so the benefit of Skin B5's ordering system is that you can also custom make your own kit, with just the topical products - though they do recommend using the skincare in combination with the tablets and caplets - and depending on your order, you will also receive a discount !


Unfortunately I forgot to take before shots which I'm really disappointed about, to be able to compare to my skin now, but even just in the overall appearance and condition of my skin I have seen an improvement, especially keeping my breakouts under control when it's that certain time of the month ! If you are someone who suffers with acne - including body acne, or even just day to day breakouts, I would definitely recommend checking out the Skin B5 range and seeing what there is for you. The customer service is incredible and can always help you work out which products would be best for your skin issues and tailor a plan for you ! There is also a table on their website, which matches up skin concerns, to which products they recommend for them (Linked Below)

Skin B5 Website

Skin B5 Product Recommendations

I hope you were able to find this review helpful and may have possibly found a new skincare system to help you and your skincare concerns.

I hope you all have a fabulous week and I will talk to you soon !


*Post contains products that were gifted. NOT SPONSORED

Thursday, 27 August 2015

Bohemian Inspired Hairstyle Ft. Irresistible Me Extensions


Hello Lovelies, 

To follow on with the hair theme from my previous post, I wanted to share with you this hairstyle that I have been really loving. It can be worn all year round, but looks especially gorgeous during the warmer months and perfect for any occasion that you need a quick and easy, but still pretty hairstyle for. I also show you a before and after of what my extensions look like, once they're applied. Before you say anything, yes I know they don't match the ends of my hair exactly, but like I mentioned in my previous post, I'm still in the process of getting my red ends trimmed off and still need to make an appointment with my hairdresser to get my extensions cut and shaped for my hair. So ! With all that being said, I hope you guys enjoy the super easy walk-through of this hairstyle and if any of you try it out, I'd love to see it, so tag me in your pictures ! :)


I used to love creating this look with my own hair before I chopped 6 inches off it, so now that I'm able to recreate it using my new Irresistible Me Royal Remy Extensions, it gives me another hairstyle option to add to the list. Once I've put in my extensions, I take a section from near my temple under the fringe section of my hair and begin plaiting it, making it long enough to wrap across my forehead and then be pinned underneath my hair on the other side of my head. So once you've got a long enough plait, tuck the ends under your top layer of hair and bobby pin it in place. As my hair is so thick, I tend to place 2 bobby pins in a X position to really secure the plait and that's basically it ! From there you can straighten or curl the ends, it's totally up to you ! This hair style is so customisable, you can make the plait as big or small as you like and tweak it your liking !


I hope you were able to gain some hair inspiration and possibly a new hairstyle to try out yourself. Like i said above, if you do try it out, please tag me in the photo because I'd LOVE to see it !

If you were wanting to purchase the extensions I've used, or have a look at all the other incredible products that Irresistible Me stock, then check out the link below !

Irresistible Me Website

I hope you all have an amazing rest of the week and I will speak to you soon


Monday, 24 August 2015

Irresistible Me Royal Remy Hair Extensions Review


Hello lovelies,

It has been a hot minute since I last put up a blog post ! If you haven't seen on any of my other social media, I changed courses a couple of months ago and have been super busy on placement for it as well, but I wanted to introduce you all to this fabulous company that I have recently been introduced to.


If you haven't heard of Irresistible Me, they are a company who sell 100% natural Remy clip-in hair extensions, as well as hair accessories and tools. They specialise in high quality hair at an affordable price, which is perfect if you're someone who likes to watch how much you spend ! Obviously depending on what your hair needs are and what look you're trying to achieve will depend on what product you order, whether that's a clip-in pony tail or highlights, all the way through a 260g set of clip-in extensions, there's a variety of options, in a wide range of colours to choose from. By no means am I being paid to say any of this, they are just awesome hair extensions and I want you guys to know about them !


I've always had a love hate relationship with my hair. When it's long, I want it to be short, but then when its short, I want it to be long again. I've never been one to be attached to my hair, so if it means cutting off 6 inches of my hair, then so be it ! As my hair is extremely thick, I chose the Royal Remy hair 22 inches 200g bundle in Ash Blonde, which comes with 10 pieces - 1 Four clip, 2 Three Clips, 5 Two clips and 2 One Clips.  As you can see in the image above, they come in a clear plastic pocket, with 9 of the pieces being in the left side and then the 10th piece on the right hand side as a bit of a test clip. Before you open the entire packet, open the side with the single extension in it, to make sure you're completely happy with the extensions, in terms of colour and length, because once you open the entire packet, they are unable to be returned. They also include a couple of extra clips, in case the original ones come off and get lost or you want added grip on your extensions and want to sew them on yourself.


If you've noticed in any of my recent photos, I still have the slightest hint of red on the ends of my hair, which I'm gradually getting trimmed off. So when choosing my extensions, I wanted them to match my natural hair colour, which is why I haven't included a photo of the extensions applied, but do stay tuned for photos on my Instagram ! So far I've loved the amazing quality and how natural the hair looks. If there are any other questions you have about the hair extensions or Irresistible me, feel free to leave them below or on any of my social media. They also have great customer service, so will be able to help you with any of your inquiries !

If you're interested in purchasing from Irresistible Me or wanting to check them out online, I'll link all their social media accounts below !


Have a fabulous week and I will speak to you all soon !


*Post contains products that were gifted

Friday, 12 June 2015

My Top 5 Winter Lipsticks


Hello Lovelies,

I hope you are all doing very very well ! Today when I woke up, I had the urge to blog. I didn't know what about, but I just wanted to write something. After having a think and noticing the gloomy weather outside, I thought I'd share "My Top 5 Winter Lipsticks" with you all. I was also thinking of doing a Summer version for all of you in the northern hemisphere, so do please let me know if that's something you would like to see. This won't be an overly wordy blog post, sit back, relax and I hope you enjoy. So without further ado, let's jump straight into it !


Obviously when it comes to winter, all the deep reds and purples come out. I am definitely one for a bold lip - though I do love my nudes and pinks as well - which is one of the reasons why i absolutely love winter makeup trends. Each lipstick is under $15, so they're super affordable and can all be bought from Priceline, except the Boe Professional lipstick which is sold exclusively at Big W and the Makeup Revolution lipstick which can be bought through their website. I thought I'd give you guys a brief run down about each of the lipsticks and their finish, opacity, price, etc. If there's something I haven't included which you'd like to know, don't hesitate to ask :)

Rimmel Kate Moss Matte Finish Lipstick in 107
Oxblood red shade
Matte Finish
Very opaque
$12.95

Makeup Revolution Amazing Lipstick in 100% Vamp
Deep purple Shade
Satin
Medium buildable opacity
$2.00

Rimmel Lasting Finish Lipstick in 058 Drop of Sherry
Copper rose shade
Frosted Finish
Sheer buildable opacity
$9.95

Boe Professional Colour Last Lipstick in Scarlette
Pinky red shade
Satin finish
Sheer buildable opacity
$8.95

Innoxa Satin Sheen Lipstick in Poppy
Brick red shade
Satin sheen finish
Medium buildable opacity
$14.95

Top to bottom: Innoxa Satin Finish, Boe Professional, Rimmel Lasting Finish, Makeup Revolution, Rimmel Kate Moss


I hope you all enjoyed finding out what my top 5 winter lipsticks are, I'd love to hear what some of yours are !

If you haven't seen my latest video, I will link it below !


Have a fabulous weekend and I will see you next time :)


Friday, 8 May 2015

My Top 4 Ways to De-Stress


Hello Lovelies,

In life it's only normal to have things that stress you, whether it be school, work, personal life, you name it, there's always something that can be a bit overwhelming. Recently a few things in my life have changed and also presented some new opportunities and sometimes it just feels a bit too much at times, which is why I think it's so important to take some time out for yourself and de-stress.

Candles


First and foremost, I find scents really comforting, whether it be a scented candle or a fragrance oils, there is something just so calming about a gorgeous smell in the air. My current favourites when it comes to candles are the Airwick Scented Candle in "Lemonade Stand"* and the Multicolour Silhouette candle* in "Amber Mandarin Glow", as well as the Tigerlily Viva Candle in "Coconut, Lemon & Lime". If you're not one for burning candles in your home - fire and all that, I totally get it ! - I would recommend trying out reed diffusers. You get the same effect, minus the worrying about a lit flame


Face Masks


Next up, are face masks ! Obviously depending on how my skin is, will determine what face mask I use. So far through my skincare ventures, I am yet to find a face mask that absolutely blows me away, but there are definitely a few that I tend to use on a regular basis. Some of my favourites include the Formula 10.0.6 masks that you can buy in individual packets, or a full-size tube, as well as the Lonvitalite sheet masks and the Palmer's Purifying Mask. Then all you have to do is sit back, relax and let the mask work its magic !


Reading


To me, nothing more says “de-stressing and relaxing” than reading. If you have a book you’re currently reading or have always thought about that certain book you've always wanted to read but haven’t quite got around to it, take some time out for yourself and read them! Or if you’re like me and don’t currently have a book in mind, or often struggle getting into a book, pick up your favourite magazine and catch up on the latest trends or who’s supposedly pregnant or getting divorced. Immersing yourself in something such as reading can help take your mind of things for a bit and prevent situations and events from feeling too overwhelming.


Music


Finally to de-stress I love listening to music. Whether it's something to rock out to and have a good dance and sing-a-long in my bedroom, or some nice calming and relaxing songs, music is definitely a way that I de-stress. Another great option is to create a playlist, or even a few, of your favourite songs depending on your mood. So instead of fiddling around with all your songs, they're all right there in their own little ready to go playlist. P.S don't judge me for enjoying a bit.... okay, a lot of One Direction.


I hope you all enjoyed "My Top 4 Ways to De-Stress", I'd also love to hear of any other ways you de-stress !

Have an incredible weekend and to all you mothers, aunts, grandmothers, sisters, important female figures and men who play a mothers role, I wish you all a happy mother's day !


*Post contains products that were gifted. This is NOT a sponsored post.

Monday, 20 April 2015

Feet that don't make you go eep!


Hello Lovelies,

I know, I know ! No one wants to talk about feet, whether it's weird lumps and bumps, that look like they belong to some extraterrestrial creature, or ridiculously dry and cracked heels, feet aren't always the most pleasant thing to show off, let alone talk about, particularly in Winter. When I think of cold weather, I think of dry skin, in my case, extremely dry feet. Nice feet are something that I have not been blessed with, especially with the fact that I'm not very good at taking care of my feet - don't worry, I'm not going to put you through seeing my hideous feet haha. Instead, I thought I'd take you through my routine of how I keep my feet looking as nice as possible, all year round !


As I do this routine after my nightly shower, I make sure my feet are completely dry and that there is no trace of moisture. I then take my Scholl Velvet Smooth Express Pedi* and start to exfoliate the dry patches on my feet, focusing on my heels and the outside edge of my foot, as that's where I get the most dry skin. I'll go over the area for a few seconds - making sure not to over exfoliate - and check every couple of seconds to see if I have reached my desired level of smoothness. Obviously my feet aren't going to be as soft and smooth as a baby's bum, but as long as there's no rough and overly dry patches, then it's okay with me !


Once my feet are nice and smooth, I next take my Scholl Eulactol Heel Balm Gold* and massage it into my heels, as well as any other particularly dry patches that I have. If you're like me and often have extremely dry heels, this will be a life saver ! With a non-greasy formula, the balm soaks in right away. To get a bit "science-y" for a second, the balm contains Urea which is a humectant, this means that it not only absorbs water, but it also has a very high water content itself, this helps minimise the water lost through the skin, helping keep the skin supple and well moisturised. With the use of this balm, there are visible results in just 3 days ! Scholl not only has some great clinically proven products to help relieve and heal cracked heels, but they also feature some amazing tips on how to keep your feet looking their best !


Finally I finish off with a good slather of moisturiser. I'm currently loving the Premium Spa SOS Moisture Balm in Frangipani and Coconut. It not only has a really thick - almost mousse like - texture, but it smells incredible ! Once my heel balm has soaked in, I then apply a generous amount of this to my feet paying particular attention to my more dry spots - heels, balls of my feet.... who am I kidding, my entire foot ! After applying my moisturiser I put on a thick pair of socks and sleep with them, to wake up to gorgeously smooth and supple feet.

I hope you guys enjoyed my feet saving routing and were hopefully able to pick up some tips. If there are any tips and tricks you have, please do feel free to comment them below ! I'd love to find out more :)

Have a fabulous week and I will speak to you all soon !


*Post contains products that were gifted. This is NOT a sponsored post.

Thursday, 2 April 2015

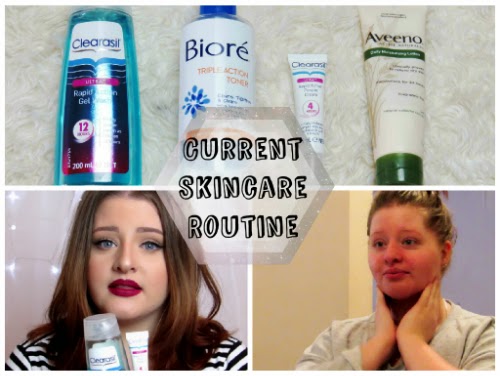
Current Skin Routine


Hello Lovelies,

Welcome back to another week on Coat of Cosmetics. So I realised that it's been a hot minute since I last covered my skincare routine in a video and that I've also never talked about it in a post. I thought today, I'd go over what I use to keep my skin as clear and as hydrated as possible, as well as introducing you guys to an incredible line from Clearasil line.

-----------------------------

Personally, I like to keep my skincare routine quite basic, as I find this is how I get the best results. Morning and night, I start off with washing my face with the Clearasil Ultra Rapid Action Gel Wash*. If I'm wearing make-up I like to do a double cleanse, just to make sure I've removed ever speck of make-up, if I'm not, then I just cleanse my face once. I have the type of skin that I either see results straight away, or I get a bad reaction / my skin stays exactly the same. Within the first day or 2 of using this face wash, I immediately noticed my skin starting to clear up. Any spots I did have were either shrinking or drying up and no new nasty spots were rearing their ugly heads. The great thing about Clearasil, is they not only have incredible products, they also provide some amazing tips on their website. Be sure to check out the links listed below, for some great tips on protection from the sun, a tailored skincare system and some of their much loved products!


Next up, I use my trusty Bioré Triple Action Toner. I have been using this for probably close on 3 years, maybe even more. I love the fact at how clean it leaves my skin feeling and removes any last traces of dirt and oil, that may have been left behind. To use it, I just squirt some on a cotton round and gentle swipe all over my face, paying particular attention to my T-Zone. Due to it containing salicylic acid, I wouldn't recommend this if you have particularly dry or sensitive skin, because it will most likely just aggravate it and make it worse. If you do have oily or acne/pimple prone skin, I would definitely suggest trying it out.


For any spots that have snuck past, I treat them using the Clearasil Ultra Rapid Action Pimple Cream*. It features Acceladerm technology which helps to fight breakouts, as well as being "clinically proven to visibly reduce pimple size and redness in just 4 hours". As I show in my YouTube video (linked below) I like to apply the cream to the pimple, as well as a little bit of the surrounding area. To make sure the cream, is well absorbed before I apply my moisturiser, I brush my teeth, to give it more time to soak in.


Finally to put back moisture into my skin, I use the Aveeno Daily Moistursing Lotion. Due to some issues with my thyroid, I was developing these awful dry patches, on my temples, which started to spread to my forehead and down the edges of my cheeks. No matter what moisturiser I tried, nothing would work to fix it. The dry patches started to get to the stage, where my skin would feel quite painful and crack. I finally was watching one of Hollie Wakeham's videos were she was talking about the Aveeno Daily Moisturising Lotion and how it helped clear up a skin reaction she was having. Within a day or 2, I saw a drastic improvement in my dry skin, which continued to get better and better. For the time being, there is no way, I'd try any other moisturiser as I have had such amazing results and it's so affordable as well. In the mornings, I apply a thin layer and allow it to sink in before I start my make-up applycation. For the nighttime, depending on how my skin is feeling, I will often apply 2 coats, for an intense moisturisation over night and wake up to gorgeous hydrated skin

--------------------------------------------

I also uploaded a video going through how I use and apply my skincare, which is linked below !


I hope you all enjoyed finding out what's in my current skincare routine, I'd love to also find out what's in yours and what products you are loving !

For those of you celebrating Easter, I hope you have a lovely festive weekend and for those of you who don't, I hope you have a fabulous weekend in general


Veroniieecar :) xx


*Post contains products that were gifted

nRelate Posts and Homepage